Implementation Guides
All packages referenced are under the root net.insprill.robotinsprill package.
For more information on Kord, check out their Wiki
and Dokka docs.
Use the table of contents on the right to see all guides available here.
Adding Commands
Robot Insprill supports two types of commands:
- Message Commands
- Slash Commands
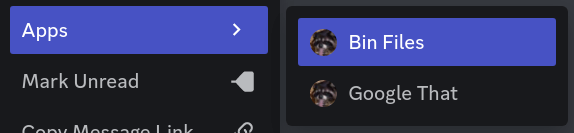
Message commands are the commands you see under 'Apps' when right-clicking a message.
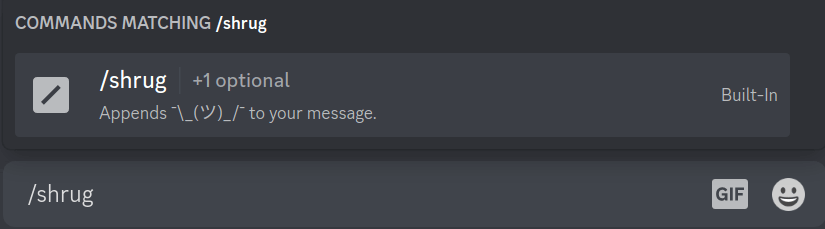
Slash commands are the commands you see when typing in a forward slash (/)
Message Commands
To add a message command, create a new class in the command.message package.
This class should extend MessageCommand
import net.insprill.robotinsprill.RobotInsprill

class MyCommand(private val robot: RobotInsprill) : MessageCommand()
To set the name of the command, you'll need to override the name parameter.
You'll also need to ensure people can disable the command. To do this, you can add a new config property and reference it here.
For the command's functionality, you'll need to override the execute function.
import dev.kord.core.event.interaction.MessageCommandInteractionCreateEvent
override suspend fun execute(context: MessageCommandInteractionCreateEvent) {
}
If you need to do something when the command is registered, you can override the setup function. This is not required.
import dev.kord.rest.builder.interaction.MessageCommandCreateBuilder
override fun setup(builder: MessageCommandCreateBuilder) {
}
Now that you have your command class, you'll need to register it.
This can be done in the RobotInsprill class.
Head to the #registerCommands function, and the call to CommandManager#registerCommands.
As the second parameter, you'll see a listOf function call with some other message commands in it.
Simply add your command to this list, and you're good to go!
Slash Commands
To add a slash command, create a new class in the command.slash package.
This class should extend SlashCommand
import net.insprill.robotinsprill.RobotInsprill
class MyCommand(private val robot: RobotInsprill) : SlashCommand()
To set the name and description of the command, you'll need to override the respective parameters.
override val name: String
    get() = "My Epic Command"
override val name: String
get() = "Does something awesome"
You'll also need to ensure people can disable the command. To do this, you can add a new config property and reference it here.
For the command's functionality, you'll need to override the execute function.
import dev.kord.core.event.interaction.ChatInputCommandInteractionCreateEvent

override suspend fun execute(context: ChatInputCommandInteractionCreateEvent) {

}
If you need to do something when the command is registered, you can override the setup function. This is not required.
import dev.kord.rest.builder.interaction.ChatInputCreateBuilder

override fun setup(builder: ChatInputCreateBuilder) {

}
Now that you have your command class, you'll need to register it.
This can be done in the RobotInsprill class.
Head to the #registerCommands function, and the call to CommandManager#registerCommands.
As the first parameter, you'll see an arrayOf function call with some other slash commands in it.
Simply add your command to this list, and you're good to go!
Audit Logs
Category
To add a new audit log category, create a new class in the audit.category package.
This class should extend AuditCategory, passing in the same values to its constructor
import net.insprill.robotinsprill.RobotInsprill
import net.insprill.robotinsprill.audit.AuditManager

class AuditSomethingCool(robot: RobotInsprill, audit: AuditManager) : AuditCategory(robot, audit)
Audit logging is done though Kord events.
These events must be registered in the overridden registerEvents function.
To register events, we use the event function from the AuditCategory class.
The generic parameter is the Kord event to listen to. In this example, the BanAddEvent.
The other parameter is a boolean defining whether this log is enabled. It should be taken from the BotConfig.
To log the action, you can use the send function.
This comes in two variants:
#send(user: User?, color: AuditColor, title: String, description: String?)#send(color: AuditColor, title: String, footer: String?)
The former should be used when logging events performed by, or including a user. The latter should be used when logging events that aren't associated with a user.
Now that you have your audit log category, you'll need to register it.
This can be done in the AuditManager class. Head to the #setupEventHandlers function, and you'll see a call
to arrayOf containing other categories.
Simply add your category to that list, and you're good to go!
Configuration
To add new configuration options, you'll need to modify the BotConfig class in the configuration package.
This class may look a little overwhelming at first, but it's actually quite simple.
The first data class, BotConfig, is the root of the config file.
You'll see here all the root keys you see in the dev.yml file.
Inside of that, you'll see other data classes, each representing a level of the config file.
If you pull up the dev.yml file next to the class, you'll start to see the resemblance.
Once you're familiar with the layout of the class, you're ready to add your own options to it.
Options should be defined in snakeCase in the class, and kebab-case in the configuration file.
We use Hoplite for deserialization of the file, and it'll automatically convert between the cases.
Try to keep data classes as nested as possible to restrict the scope of them to keep the class organized, and similar to the actual config.
Hoplite supports many data types for decoding. In addition to this, we have implemented decoders for the following classes:
dev.kord.common.Colordev.kord.common.entity.Snowflake
If you want to add a decoder for a new class, you can create it in the hoplite.decoder package.
The classes there should provide you with a good template for simple classes.
Once it's created, add it to the file src/resources/META-INF/services/com.sksamuel.hoplite.decoder.Decoder.
Responses
Responding to interactions with a text message or embed is fairly common, so there's an easy way to handle it.
The BotConfig has a subclass called Message, that can have text and multiple embeds.
This can easily be integrated into an interaction response by using the InteractionResponseCreateBuilder extension
function net.insprill.robotinsprill.extension.message.
This will set the response's content field, and add all the Message's embeds.
Statistics
Implementing statistics is done in the Statistic enum in the statistic package.
The enum name will be used in the config, and should roughly follow the format CATEGORY_NAME.
The enums take a single parameter of (RobotInsprill, Guild, String?) -> String.
The first parameter is an instance of RobotInsprill that can be used for logging.
The second parameter is a Guild that can be used to get information about the bot's guild.
The final parameter is the optional data string defined in the config.
This can be used for passing in additional data, like a channel ID for YouTube stats.
The function should return a string that will be inserted into the channel name.
Try to keep the string as short as possible.
When returning numbers, call the net.insprill.robotinsprill.extension.pretty function to round and pretty print it.